Source : Photo Radar
")
Image copyright Derek Croucher
But here’s the thing: if you rigidly apply these rules of landscape photography to every single shot you take, your images will soon look very samey and formulaic. It’s a balancing act between convention and experimentation, and to help you make the best creative decisions we’ve put together what we believe are the 10 Commandments of Landscape Photography – and a helpful guide for knowing when to break them.
10 Commandments of landscape photography (and how to break them)
")
Image copyright Harald Braun
Commandment 1: Shoot during the golden hour
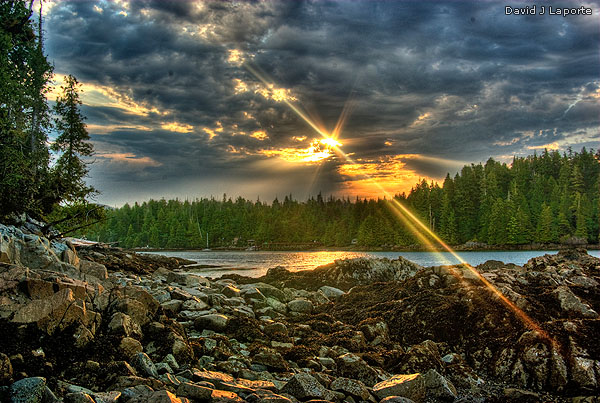
Great landscape photography is as much about planning, preparation and patience as it is about focal lengths, f-stops and filters. A few minutes spent checking the weather forecast, scouting the location and waiting for the right light can make an enormous difference to the final image.Of course, your wait for the ‘right’ light will be a lot shorter if you head out at the right time of day. Shoot too close to noon in the summer and you’ll be rewarded with short, dense, black shadows and harsh highlights from the overhead sun, so that even a hilly landscape will look flat and uninteresting. However, if you shoot in the hour after sunrise or before sunset the sun is much lower in the sky, and the longer, softer shadows reveal the undulations in the vista before you. The light also has a warmer colour, making the whole scene look so much more inviting than a midday landscape.
The key to shooting in what’s often referred to as ‘the golden hour’ is to arrive well in advance so that the camera is set up on the tripod, the image is composed, and the filters are in place long before the perfect light appears. In the morning this means getting up before dawn, which in the summer feels like the middle of the night! It’s worth it though, because pockets of early morning mist and a light sprinkling of dew can give landscapes a magical, untouched appearance that will give your images the edge.
If you really can’t bear to get up before dawn, the best alternative is to shoot at dusk. Obviously there won’t be any dew to twinkle in the low sunlight, but any flowers that close overnight will be fully open, and it’s easier to see the image you’re composing while you wait for the perfect light to arrive.
")
Image copyright Damian Hock
You don’t have to restrict your shoot to either end of the day – provided you find the right scene, there are plenty of other occasions when the light is also ‘right’. Lighthouses and coastal scenes, for example, can look great against a deep blue sky in strong sunlight. The middle of the day is also a good time to shoot in woodlands, where the high sun illuminates the leaves.
Consider shooting before sunrise or after sunset when the land is illuminated by the soft light of the sky and moon. With exposures that run into several minutes, the results can be striking, and viewers will struggle to work out what’s different about the images. Make sure you use a good, solid tripod and set your camera to bulb mode to allow a sufficiently long exposure, triggering the shutter with a remote release.
Focusing can be tricky at night, so switch to manual focus and aim to focus about one third into the scene. Use the distance scale on your lens as a guide. To set the exposure at night, try metering with the camera set to a high sensitivity setting and at the widest aperture, and then calculate the exposure from there. An exposure of 2 secs at f/2.8 and ISO3200, for example, is equivalent to an exposure of 64 secs at f/2.8 and ISO100, or 16 mins at f/11 and ISO100.
It’s also worth activating your camera’s long-exposure noise-reduction system, although it will double the time to get each shot.
")
Image copyright Shaun Egan
Commandment 2: Use a wideangle lens
A lot of landscape photography is about capturing sweeping views. Wide-angle lenses are the logical choice because they allow you to get more into the frame. Anything with an effective focal length shorter than 50mm (or 35mm if you’re using an APS-C format camera) is considered a wide-angle lens, but 21mm and 24mm lenses are popular choices. To get an equivalent view on an APS-C camera you need to use a lens with a focal length of around 14mm-16mm.You can use the 18-55mm lens that’s usually supplied with an SLR, but the best results are produced by fixed focal-length lenses, which are generally sharper across the frame. Chromatic aberration, which reveals itself as coloured haloes along high-contrast edges such as the horizon or along branches, is also usually better controlled by lenses with a fixed focal length. These mono-focal length lenses also tend to suffer less from distortion, but then a little bowing isn’t usually noticeable in the average landscape.
The native aspect ratio of a camera is dictated by the shape of its sensor, which means that with the exception of Four Thirds and Micro Four Thirds cameras, most images tend to be captured in 3:2 format. However, there’s no reason you should stick to this. Landscapes can look great in portrait or landscape format, and in 16:9, 5:4, 4:3, square or any other format you care to use – panoramics, for example, can work particularly well.
Some digital cameras have an aspect-ratio setting that crops the JPEG files automatically to help you judge the format. And if you change your mind about the crop later on, you can simply use the uncropped raw file.
Alternatively, a couple of small pieces of card cut into two L-shapes can help you visualise the cropped image on the back of the camera.
")
Image copyright Frank Krahmer
It may not be the automatic choice for landscape photography, but a telephoto lens is useful for capturing distant details or isolating parts of a scene.
")
Using a longer lens reduces depth of field and appears to compress perspective so that interlocking hills look closer together, and repeating patterns in the landscape are emphasised.
")
Image copyright Angela Nicholson
Commandment 3: Use the Rule of Thirds
The rule of thirds was first employed in painting, and it’s also really useful for helping to compose photographs. It uses the fact that, generally speaking, we prefer to look at non-symmetrical images, and it helps us to work out the perfect arrangements of elements within a shot.Using the rule of thirds is simple but effective. When you’re composing an image, try to imagine that it’s divided up into three equal horizontal sections and three vertical sections. Many cameras have a grid view that will make this a lot easier to visualise, but you may need to shoot using live view rather than the viewfinder to see it.
As you frame the image in front of you, try to arrange key elements along one of the lines or ‘thirds’, and where possible, position important features where the lines intersect each other. With a landscape this could mean arranging the composition so that one third of the image contains sky, while the lower two thirds contain the land. Other elements, such as a tree in the foreground or a distant spire, can then be positioned where a vertical and a horizontal line cross.
")
Image copyright Zak Kendal
Using the rule of thirds can help prevent your image from looking like a random snapshot, but there are times when the subject really cries out for symmetry, and breaking the rule can add impact.
If you decide to go for a symmetrical composition, it’s essential to pay attention to every little detail so that the image is balanced and there’s nothing on one side that will distract the viewer’s attention.
Symmetrical images often work well when they are square because the symmetrical frame emphasises the uniformity of the image. If your camera doesn’t allow you to see different aspect ratios in live view mode, use the L-shaped pieces of card we mentioned earlier to help you compose a square shot.
")
Image copyright Paul Grogan
There are times when it pays to shift the balance of the composition to extremes so that one element of the scene dominates the image. This could mean shooting with a tiny slither of land in the shot with a huge expanse of blue sky above for example, or conversely, with just a tiny amount of sky above the land. It can make quite a statement.
Always take a good look at the scene before you, and weigh up which are the most important elements and where the real interest lies. If there’s a winding footpath that leads to a statue on the brow of a hill for instance, the journey up the hill is of more interest than the sky above the statue, so just include a small strip of sky.
")
Image copyright Julian Calverley
Commandment 4: Find foreground interest
When we’re out in the countryside or at the coast we look at the view in a very different way to the way we look at a photograph. Our eyes scan around and we home in on small details or the horizon, ignoring things in our peripheral vision – often not seeing what’s immediately in front of us. However, when we look at a photograph of the scene, the foreground becomes much more important to us, and if it’s a wide, empty area of grass or beach it can create a barrier, stopping us from seeing the spectacular hills and so on in the distance.One of the cardinal sins of landscape photography is including too much dull, featureless foreground in the image. However, it’s possible to transform a boring and uninteresting image into one that grabs the viewer’s attention by including something in the foreground. Foreground interest can improve landscape images in a number of ways – it’s more than just filling an empty space. It helps to give the scene a sense of scale, and it makes the progression from the near to the middle and far elements clearer, creating a journey for the viewer’s eye.
The average landscape is full of potential objects for inclusion in the foreground. Gates, signposts, flowers, shrubs and rocks can all be pressed into service – all you need to do is walk around until you find something suitable. If there’s nothing in situ, you can always try moving something such as a branch or a few autumnal leaves into the right place.
As well as adding foreground interest, things like streams, footpaths, fences and walls that extend into the landscape can help draw the viewer into the scene. They create what’s often referred to as a leading line. In addition to physical leading lines, landscape images can benefit from implied leading lines – the direction of the gaze of people in the scene, for example, will guide the viewer’s eyes in a particular direction. People walking along a footpath will also emphasise the route into the image.
")
Image copyright Paul Grogan
Sometimes it’s the uniformity or emptiness of a scene that gives it impact, and rather than looking around for something to clutter up the image it may be better to put the space to positive use. The key is to identify what’s important about the scene and work out how to make the best use of it.
In the example on the right, the bottom two thirds of the frame are almost empty, but this is positive rather than negative space, as it leads the eye in, and directs the viewer’s attention towards the mountain on the horizon.
")
Commandment 5: Use a steady tripod
If you want sharp landscape images then a good, solid tripod is essential, but it won’t guarantee shake-free shots – there are a few techniques you need to employ as well. A remote release is a sensible investment because this will enable you to trigger the shutter without touching the camera directly. If you forget your remote release, use your camera’s self-timer.With a DSLR, it also pays to use mirror lock-up. This flips the mirror up with one press of the shutter release, before triggering the shutter to fire on the second press, after a delay, to allow vibration from the mirror movement to stop. With some cameras the self-timer can be linked to the mirror lock-up feature, so the shooting process takes place with a single press of the shutter release.
An added advantage of using a tripod is that it slows you down, and this automatically makes your photography more considered. It also means the camera is fixed in one position while you experiment with different filters and exposure settings and so on.
")
Image copyright Ben Brain (Future)
Although a sharp image of a landscape might record exactly what the scene looks like, it may not capture the atmosphere of the location or the emotion of being in a particular place.
As we look around a woodland, for example, we don’t see all the tiny details of the leaves and trees around us because they are blurred as we move our eyes. If the camera is moved during the exposure you can replicate this blurring effect. You don’t need an especially long shutter speed to blur an image – it can be achieved with just 1/15 sec, but a longer exposure of around a second or more allows for larger, more dramatic movements and greater blurring.
It’s often possible to get a sufficiently long exposure by selecting the lowest available sensitivity setting and using a very narrow aperture. In bright conditions it may be necessary to use a neutral density filter on the front of the lens. This cuts out some of the light so that a slower shutter speed can be used.
Try to move the camera in one smooth movement. It can be helpful to use the self-timer to delay the exposure by a couple of seconds as this gives you time to adjust your grip and start the camera movement just before the shutter opens.
Because all the highlights and shadows are blurred, the image will look flat straight from the camera, but this is easy to adjust using Levels in an image-editing application.
")
Image copyright Guy Edwardes
Commandment 6: Focus one third in
Getting a landscape sharp from front to back requires careful focusing. If you focus on the foreground, the depth of field won’t extend as far as the background, and the horizon will be soft. If you focus on the horizon, the foreground will be soft.The trick is to focus at what’s called the hyperfocal distance. This is the point that will make the maximum use of the depth of field. Finding the precise hyperfocal distance requires look-up tables (which can be found online) or aperture and distance markings on the lens, which some modern zoom lenses don’t have.
Roughly speaking, depth of field extends about twice as far behind the focus point as it does in front. So, focusing on a point that’s approximately one third of the way into the scene should ensure the maximum depth of field is used. For greater precision, activate your camera’s live view mode. Select the area on-screen where you want to focus, then use the magnify option to zoom into the target area.
With the camera set to manual focus mode, you can now adjust the focus until the correct part of the scene is sharp. In bright sunlight you may find that you need to shade the LCD so you get a clear view. Now, using the lens focus ring, simply adjust the focus back and forth until you find the point at which the details are sharpest.
")
Image copyright Angela Nicholson
If there’s an important, stand-out feature in the landscape, you don’t want it to be just ‘acceptably sharp’, you want it to be the sharpest part of the image – after all, that’s what viewers will be drawn to look at. In these cases, forget about focusing a third into the scene and focus bang-on the main subject.
It’s especially important to focus on the main subject if you do decide to go ahead and break commandments four (Find foreground interest) or nine (Use a narrow aperture).
")
Image copyright Lee Beel
Commandment 7: Balance the exposure
Our eyes have a much greater dynamic range than a digital camera. We can see marginal differences in the brightness of white fluffy clouds above a landscape as well as the detail of the grass in the deep shade beneath the trees, but cameras can’t – in an image the clouds may be a burned-out mass of white, and the shadows may be a featureless black.To produce images that appear the same as we see the landscape, you need to balance the exposure of the brightest and darkest parts of the scene. With landscapes this usually means reducing the exposure of the sky so that it matches the exposure required by the land. Traditionally, this is done with a graduated neutral density filter, with the grey section covering the sky so that the exposure is reduced in this area.
It’s important to take care with the positioning of the filter’s light-to-dark transition. It needs to be close to the horizon without descending beneath it, otherwise the furthest part of the land will be darkened.
Graduated ND filters are available in a variety of densities, usually cutting out one, two or three stops of light at their densest part. They come with hard and soft gradations: a hard grad is useful when there’s a clear, fairly flat horizon, whereas a soft grad helps when features such as trees or mountains break up the skyline. If you only buy one ND grad, go for a hard grad that cuts out two stops of light.
Digital photography offers another way of balancing the exposure across a landscape image; shooting two (or more) images with different exposures and then combining them into one single picture. This can be done using high dynamic range (HDR) software such as Photomatix, or Photoshop’s Photomerge feature, but the end result doesn’t have to look like an over-processed HDR image.
Often the best way to merge multiple exposures is to combine them manually in Photoshop or Photoshop Elements. Just drag one image onto the other to create a new layer and then erase part of the top image to reveal the one below, or use a layer mask to conceal part of the upper layer.
")
Image copyright Paul Grogan
Sometimes at sunrise and sunset the sky is the most interesting and dramatic part of the scene, and balancing the exposure only reduces its impact. When this happens, don’t worry about the exposure of the foreground – look around for interesting shapes along the horizon to help give scale and context, and then expose for the sky and allow anything beneath it to become silhouetted. Conversely, if the sky is flat, white and dull, don’t include it in the shot and concentrate on the land instead.
Always try to shoot so that the sides of hills create the backdrop to your scene, or photograph interesting patterns and details.
")
Commandment 8: Boost greens and blues
The majority of landscapes contain lots of green and blue so it makes sense to give these colours a little extra zing. The landscape option of the scene modes usually cranks up the saturation of greens and blues. It also takes control of white balance and exposure, and it will attempt to set a low sensitivity setting and narrow aperture so that shots have lots of sharp detail.Experienced photographers who want to take control of the exposure themselves will find aperture-priority mode a better choice, but they can still boost greens and blues by using the landscape option of their camera’s colour modes – these are called Picture Styles on Canon cameras and Picture Control settings on Nikon SLRs. Scene modes tailor aspects such as exposure, white balance, sharpening and colour, whereas colour modes merely adjust the balance and saturation of colours, and they can be applied in any exposure mode.
In-camera colour preferences are applied to JPEG images, but they can also usually be applied to raw files at the conversion stage using the software supplied with the camera. Alternatively, the HSL/Grayscale section of Adobe Camera Raw enables the saturation of individual colours to be increased or decreased.
With Canon DSLRs you can use the supplied software to create your own Picture Style, which can then be uploaded to the camera for regular use in the future.
")
Image copyright Olli Kekalainen
If the scene doesn’t contain much blue or green there’s not much point in cranking up their saturation. On a beach it might be better to give the yellows or reds a boost. This can be done by selecting the portrait colour mode – don’t use the portrait scene mode as this will usually result in a fairly wide aperture, which will restrict the depth of field. Portrait colour mode is also a good choice for bringing out the warm tones of autumn.
Landscapes don’t have to be colour – they also look great in monochrome – especially if there are dramatic or stormy clouds overhead. The best digital black-and-white images are usually created by converting a colour image using Photoshop or Silver Efex Pro. A raw file is the best starting point, but we recommend shooting raw and JPEG files simultaneously if possible. Set your camera to monochrome mode so that you can see black-and-white versions of the scene on the LCD – this will help you to assess the image more accurately on your LCD.
The raw files will still have the full colour information so you can easily convert them to monochrome at a later stage if you wish.
")
Image copyright Adam Burton
Commandment 9: Use a narrow aperture
Getting the foreground, middle distance and background of a landscape acceptably sharp means using a narrow aperture to get lots of depth of field. Aperture priority is a good choice of exposure mode for this because it enables you to set the aperture while the camera determines the shutter speed. Don’t assume that the camera will always know exactly what you want though – keep an eye on the histogram and make sure the highlights are retained.Also, make sure you don’t fall into the trap of using the very narrowest aperture available on your lens because this will often result in a soft image because of diffraction. Diffraction is the bending of light waves as they pass by the aperture blades – the narrower the aperture, the more significant it will be. To avoid the problem, use an aperture of at least a stop or two wider than the lens’s minimum.
Using a narrow aperture and a low sensitivity means that fairly long exposures are required, so make sure you obey commandment five and use a tripod.
It can be hard to get everything in a landscape sharp, so focus stacking provides a convenient digital solution. Focus stacking involves taking several images from the same position (with the camera on a tripod), but with the focus set to a different point in each photo. These images can then be merged using Photoshop CS4 or 5 using Edit>Auto Align followed by Edit>Auto Merge.
A free software package called CombineZM is available for download by PC users from www.hadleyweb.pwp.blueyonder.co.uk.
")
Image copyright Mitsushi Okada
While we usually think of landscape images as having lots of sharp detail, you can add impact by restricting the focus to isolate a specific part. To do this, use a wide aperture to limit the depth of field, so that only a small section of the image is in sharp focus.
The best subjects for this type of approach are often in the foreground of the landscape because they will be comparatively large, and the soft, blurry surrounding helps put this detail into context without causing too much distraction. Play around with a sequence of apertures to find the right one. Opening up to f/2.8, for example, may blur a background beyond recognition, whereas f/4 or f/5.6 will leave enough recognisable detail to make sense of the scene.
Using a wide aperture to blur the foreground can also add emphasis to a dominant but more distant part of a landscape, such as a windmill or lighthouse. It’s a good trick when breaking commandment four to make use of positive space.
You could even consider merging two images taken with a wide aperture with the focus in different places.
")
Image copyright Adam Burton
Commandment 10: Use a low ISO setting
A low sensitivity setting is a passport to smooth, noise-free images with plenty of detail. Failing to observe this commandment can turn uniform areas such as a blue sky into a mottled mess, and leave deep shadows speckled with colour.Unless you’re trying to blur movement, there’s usually little to be gained from using a low sensitivity expansion setting, such as ISO50. Even at the low end, straying from the native sensitivity range usually results in some compromise in image quality – often reducing the dynamic range. For most DSLRs the lowest native sensitivity value is ISO100, but for some older models it’s ISO200.
Using a low sensitivity setting along with a narrow aperture usually demands a slow shutter speed, and in most instances this means a tripod is required to get sharp images.
Most images benefit from post-capture sharpening, but it’s particularly true of landscape shots because it enables the treatment to be applied selectively. Selective sharpening allows details to be made crisp without introducing artefacts in even-toned areas such as the sky.
Software packages such as Nik’s Sharpener Pro enable different levels of sharpening to be applied to specific image areas, but it can be achieved with any software that enables images to be combined using layers.
Selective sharpening involves creating a duplicate layer and applying sharpening just to the land on the top layer. The eraser tool, or a layer mask, can then be used to remove the sky of this layer to reveal the unsharpened sky of the background layer below.
")
Image copyright Alison Shaw
If you’re shooting a misty landscape or you’re shooting in stormy conditions there’s often little point in getting too wound up about using a low sensitivity setting. In fact, using a high ISO setting to introduce some noise can really bring out the atmosphere of the scene. If you decide to go down this route, you may need to push your camera to its maximum setting to get the levels of noise you want.
As usual, the best results are achieved with raw images because they provide the most control over noise. You might want the light and shade speckling of luminance noise, but occasionally coloured noise is desired. Use your raw conversion software to reduce the level of chroma noise while keeping the luminance noise.
Monochrome images can work especially well with a bit of ‘grain’, and they transform coloured noise into luminance noise.


 From: Evan Sharboneau